 The
goal of this tutorial is to learn about Android development, including
the tools and resources you need to in order to start creating apps.
In the last part we became acquainted with the Eclipse IDE. Since the
platform began, Eclipse has been the main supported development
environment used to create Android apps.
The
goal of this tutorial is to learn about Android development, including
the tools and resources you need to in order to start creating apps.
In the last part we became acquainted with the Eclipse IDE. Since the
platform began, Eclipse has been the main supported development
environment used to create Android apps.
Eclipse is still the
recommended IDE for Android, but this is set to change with the new
Android Studio IDE. Android Studio is not yet complete, but it is
available as an early access preview. This new IDE is designed
specifically for Android development and based on IntelliJ IDEA in
conjunction with JetBrains. When it is complete, Android Studio will
improve several aspects of its Android development, not the least of
which is the process of designing UIs to support the range of Android
devices in use. In this tutorial we will install and explore Android
Studio.
Introduction
Although Eclipse should still be your main focus for developing Android apps, it is worth spending some time with Android Studio, particularly if you intend to be involved in Android development long term.1. Installation
Step 1
As you have seen, the ADT Bundle download includes the Eclipse IDE for Android development. To try out Android Studio, download it from the Android Developer site. There are versions for Windows, Mac, and Linux, so choose the one for your operating system.Step 2
On Windows, install Android Studio by running the executable “.exe” file that you downloaded. Follow the instructions to complete the installation. On Mac OS X, install by opening the DMG file you downloaded, then drag Android Studio to your Applications folder. On Linux, you need to first unzip the downloaded directory. Inside the unpacked folder, browse to the “bin” directory. You can execute Android Studio from here by running the “studio.sh” file.
2. Start a Project
Step 1
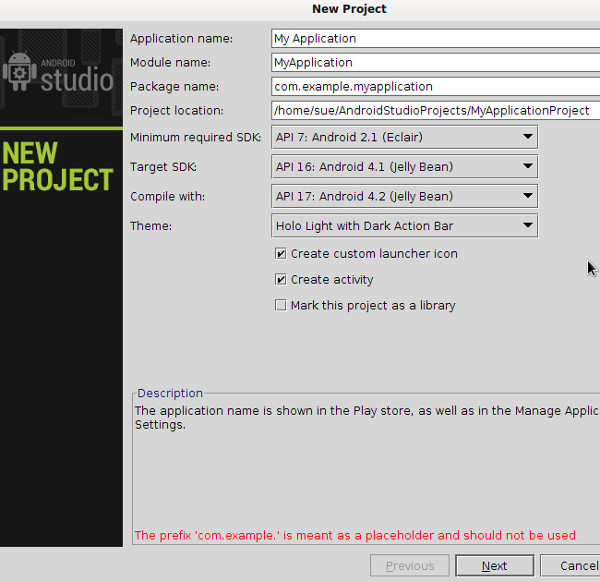
Let’s get to know Android Studio by starting a project as we did with Eclipse. When you start Android Studio for the first time, you will be presented with a welcome screen that offers a few options. Choose “New Project”.


Tip:
Android Studio can be pretty unstable. If anything goes wrong when
creating your first project, try updating the software by choosing
“Help” and “Check for Updates”.
3. The Environment
Step 1
Let’s now look at the elements of the Android Studio environment with your new project open. When it creates a new project, Android Studio opens the layout and Activity files for editing, as well as loads a preview of your app’s UI on a virtual device screen. As you can see, the default window layout is slightly different than Eclipse.

The files Android Studio should have opened when you created your project are the Activity file, which you will find in the package folder inside “java”, and the layout file, which is stored inside the “layout” folder in “res”. Notice that when a layout file is open in the editor, you can switch between design and text views, which will allow you to build and edit your UI elements both graphically and via code. When the Design view is open, to the right you will see the Component Tree, a structural overview of the layout. When the text view of a layout is open, to the right you will see the preview of the layout.

Step 2
Although you may not yet be familiar with the structure of an Android project, once you learn a little more you will see that Android Studio structures the content of your app project’s a little differently than Eclipse. The files you are most likely to work with are stored inside “src”. This is because the build system in Android Studio is Gradle-based. Don’t worry too much about this difference if you are working in both Eclipse and Android Studio in the future, as the differences are unlikely to affect you. Just get used to the fact that the source files you work with will be located in different places in the two IDEs.4. Project Interaction
Step 1
One of the better features in Android Studio is that many of the tools you need are accessible via the buttons in the toolbar. Take a moment to scroll over these now. Notice that there are quick links to launch various utilities including the AVD Manager, SDK Manager, and the Monitor that includes debugging tools.
Step 2
Like Eclipse, Android Studio provides a range of views you can use to interact with the contents of your projects. Select the “View” and “Tool Windows” menu to see the range of options. Clicking these toggles them in-and-out of visibility. Views you may find useful include the Structure view, which is similar to the Outline view in Eclipse and the Event Log view, which displays system output messages.One view you may find particularly useful once you are attempting to develop and debug apps is the “Android” view. Open it now from the “Tool Windows” menu. This view displays information about actual and virtual devices, together with the LogCat for outputting debugging messages.

5. Updates
Step 1
As with Eclipse, you need to keep your Android Studio installation up to date to get the best use out of it. You can use the “Help”, “Check for Update” tool to keep the software itself up to date regularly. This is advisable since Android Studio is under constant development, with patches often released to address issues you may be facing.Step 2
As we’ve seen with Eclipse, as well as keeping the IDE up to date, you should check for Android updates regularly as well. In Android Studio you can do this by clicking the “SDK Manager” button you see in the toolbar.
Tip: For more tips on Android Studio see the IntelliJ IDEA documentation.


